Connect and Manage PostgreSQL in Avora
Use the Database view to connect a PostgreSQL target, inspect the schema Avora expects, browse generated tables, and manage records for the current workspace.
Open a workspace and select Database in the navbar. The right sidebar controls the connection and reset behavior; the main area shows tables and rows after inspection succeeds.
Use the figure below as the visual reference for connecting and exploring workspace data. It shows the entity and enum tree, generated table data, an applied filter, and the connection configuration panel in one Database view.
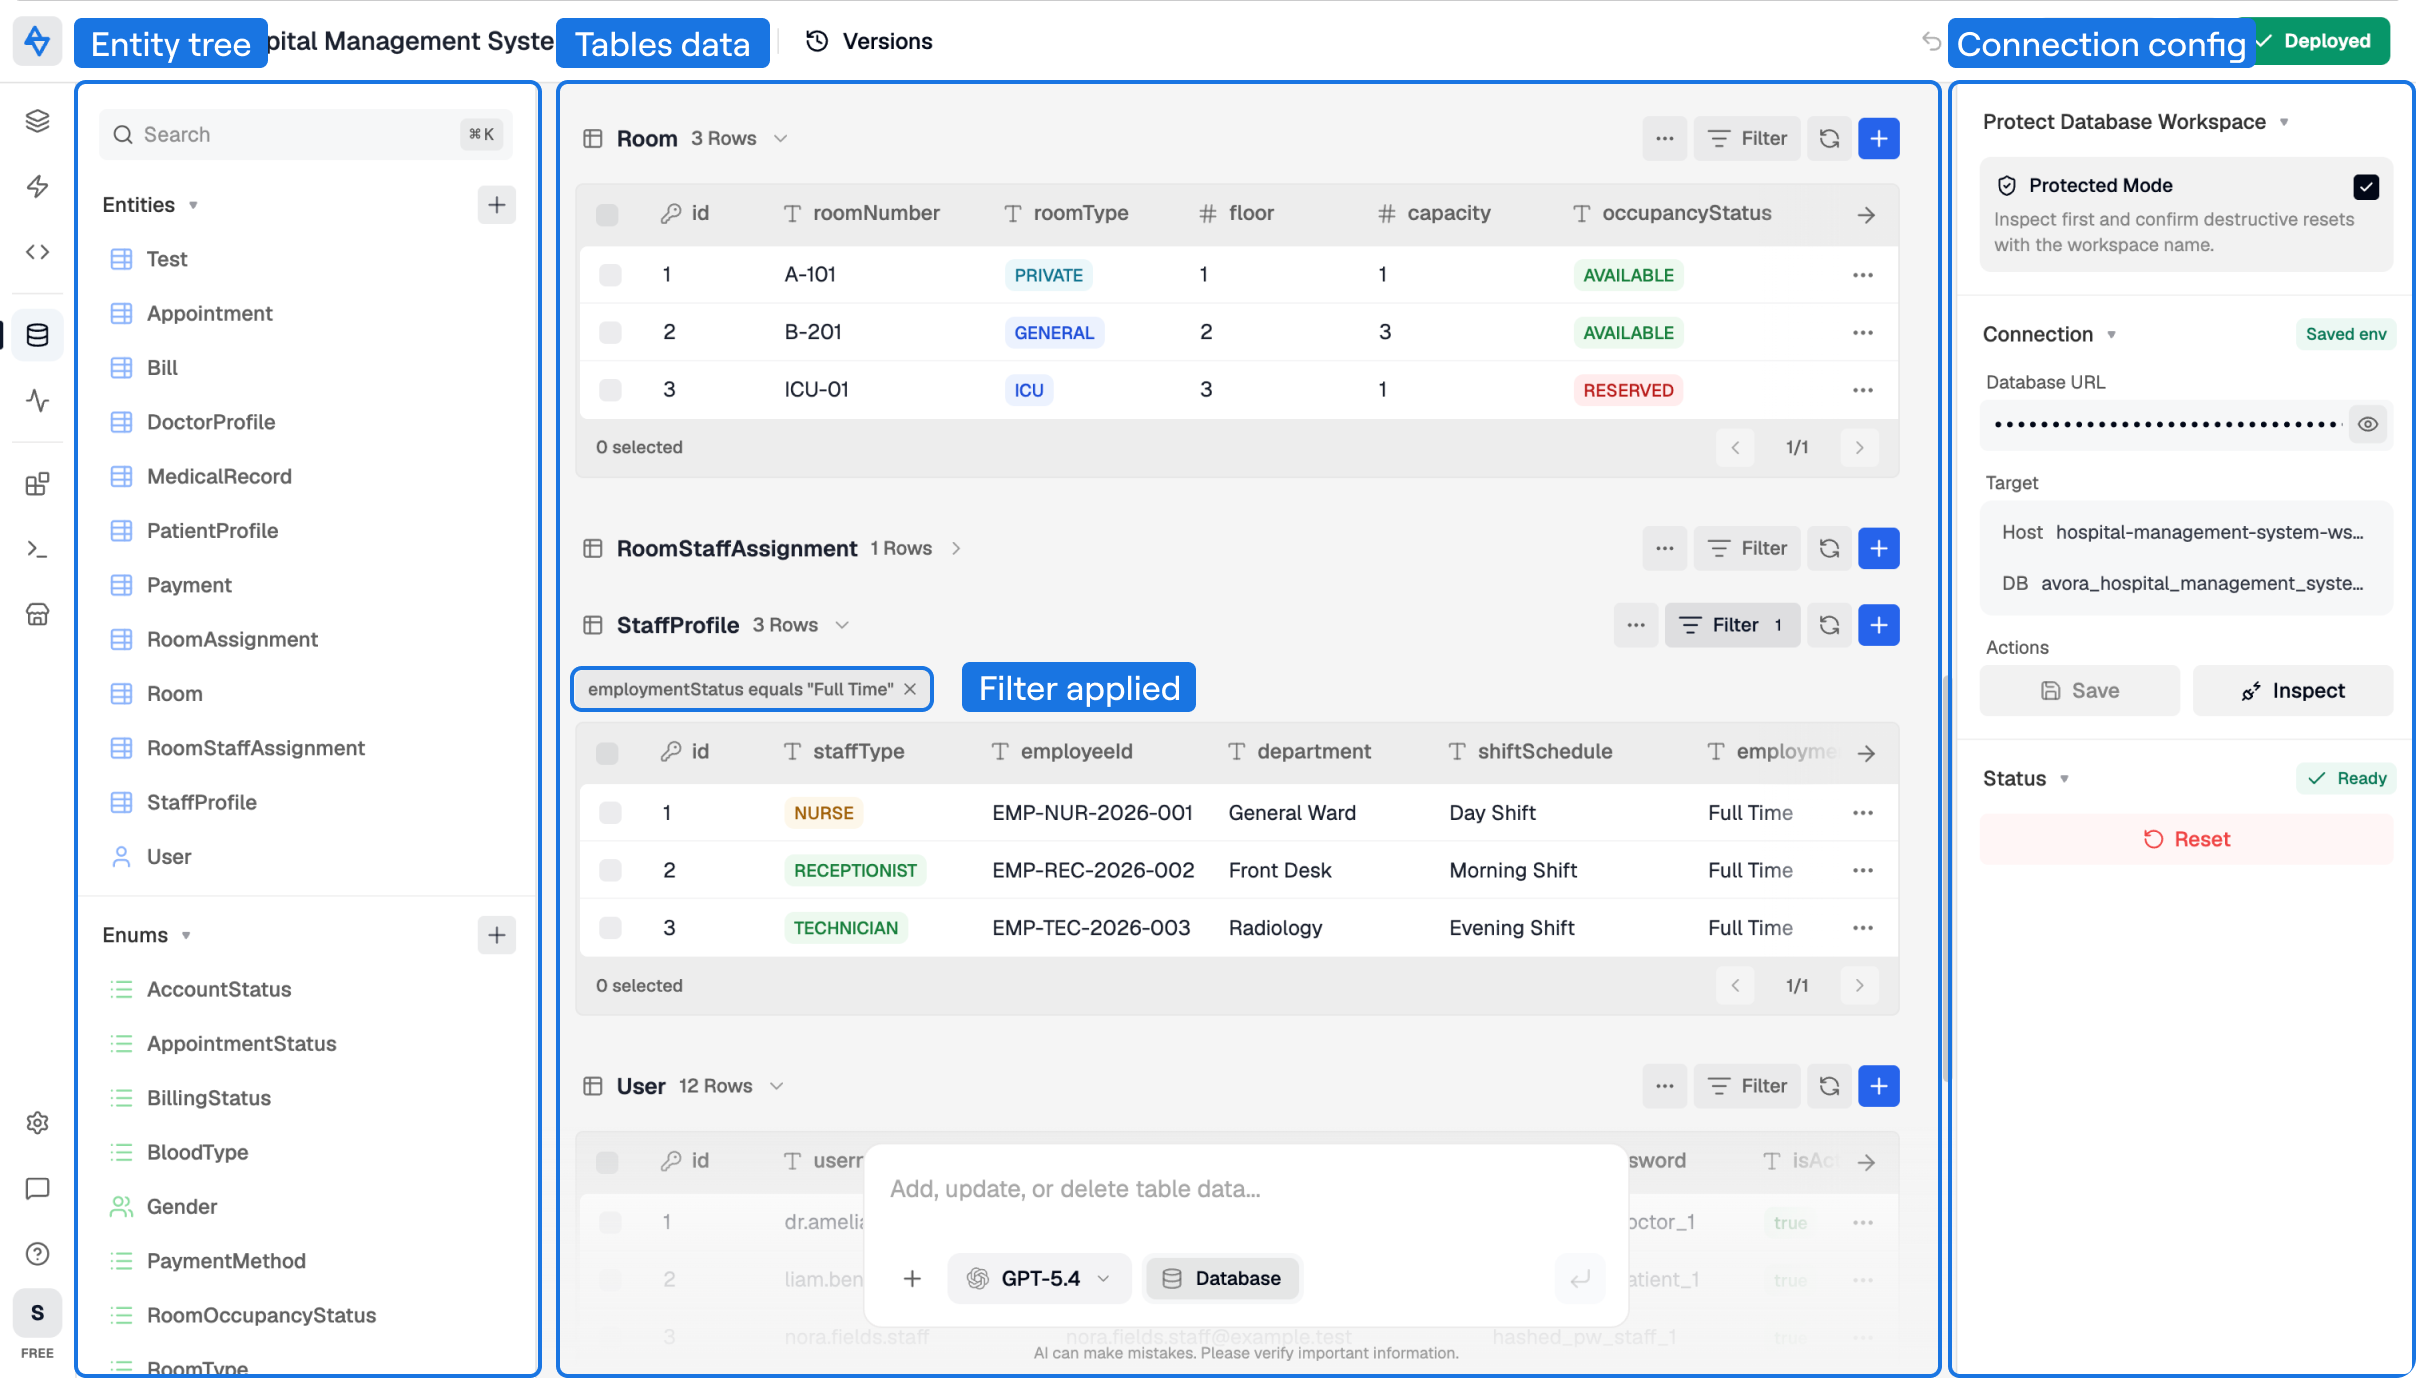
The left tree separates Entities from Enums, so you can jump between generated tables and review the controlled value sets used by those tables. The center area lists table data with row counts, filters, refresh controls, row selection, and pagination. The right sidebar stores the database URL, shows the inspected target, and displays the current database status.
Connect the Database
Connect the database before editing records. In most workspaces, Avora already has the database URL saved, so you do not need to paste it manually.
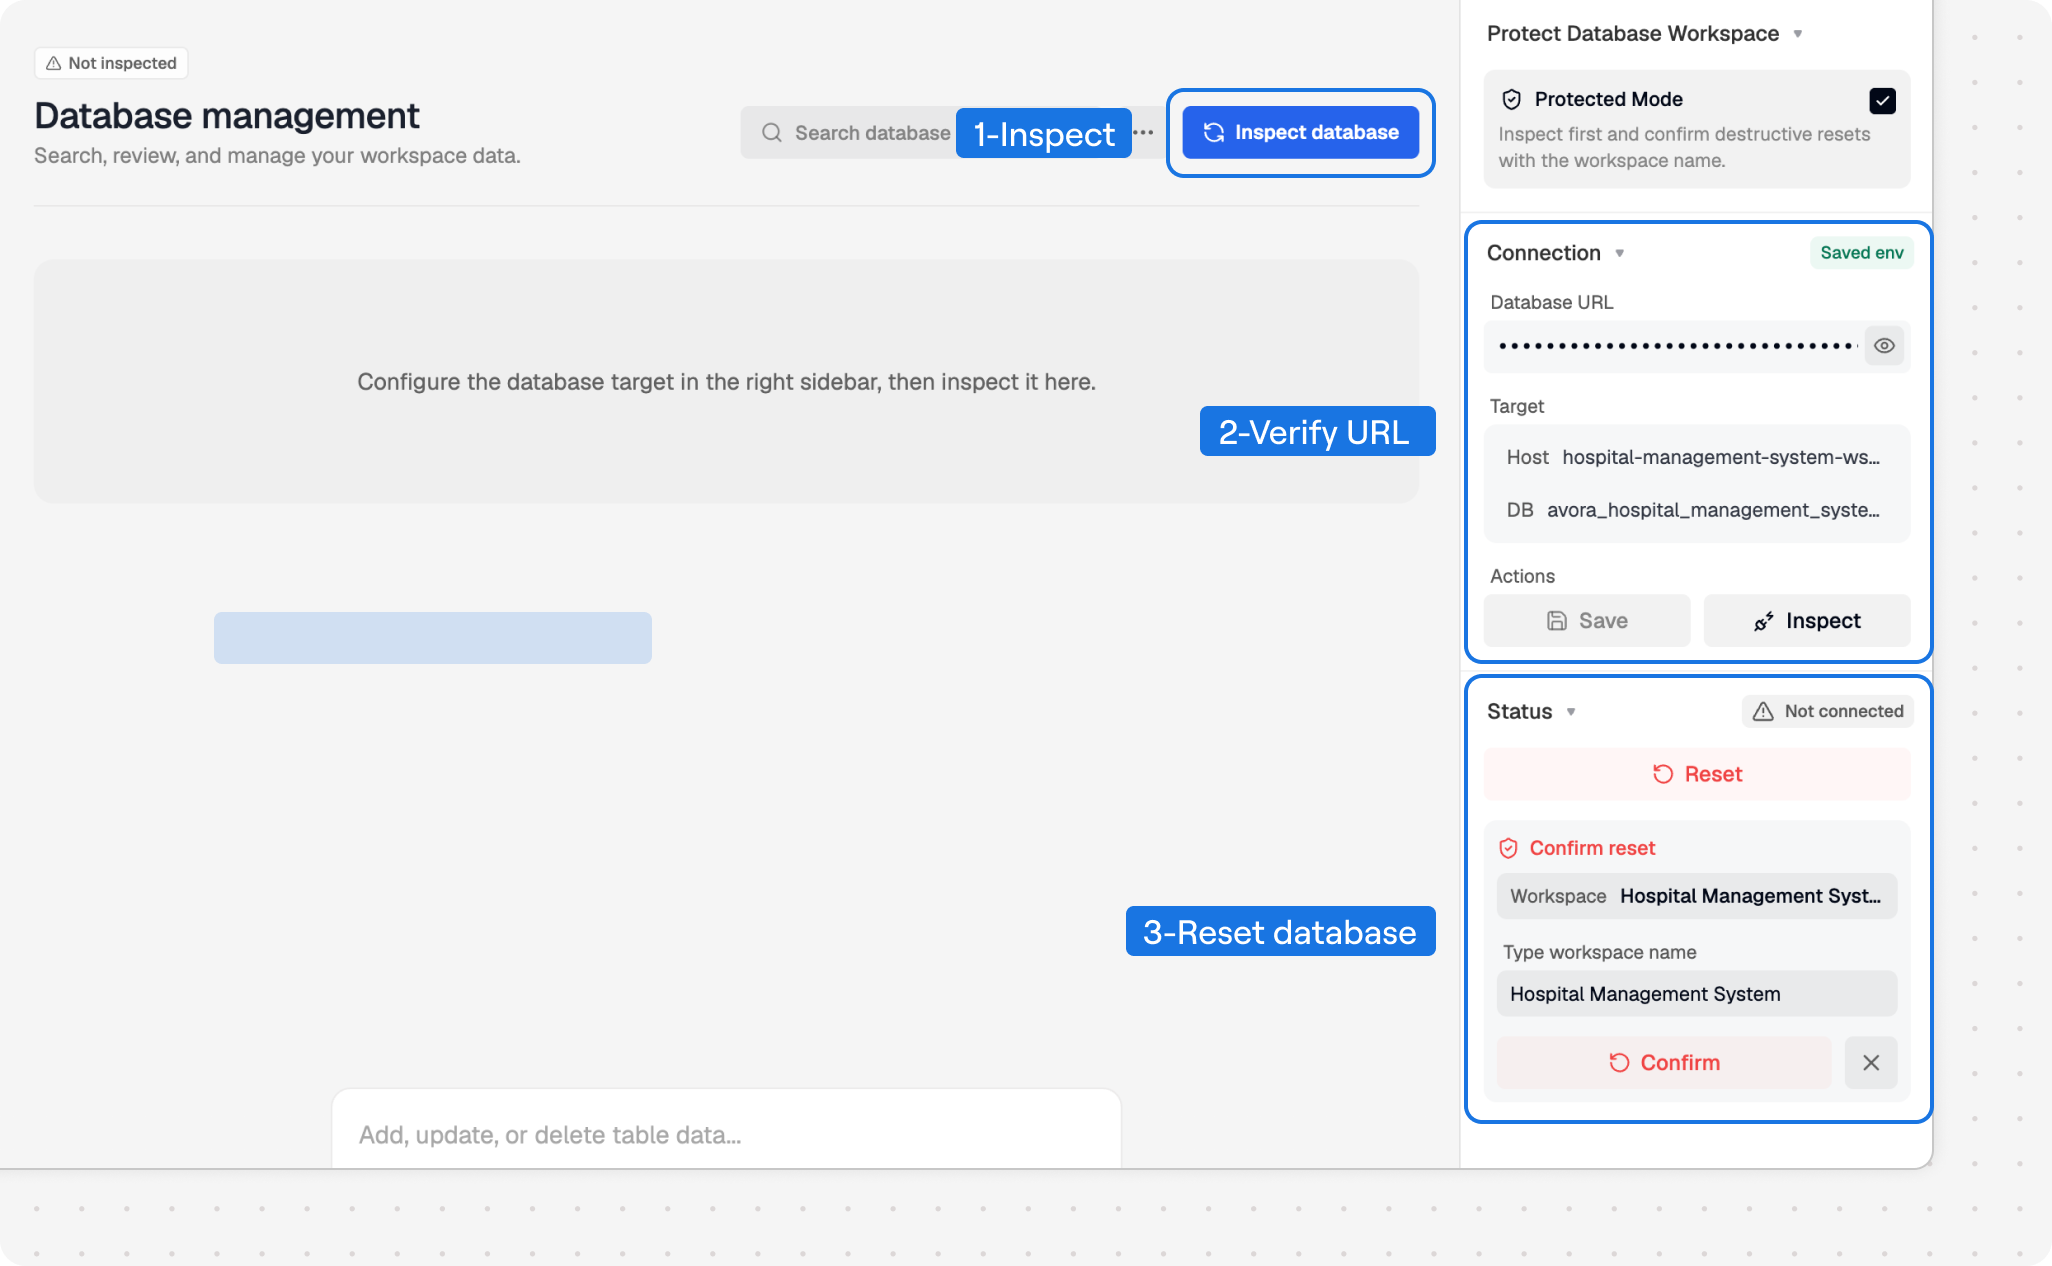
Required steps:
- Select Inspect database.
- If Avora asks for reset confirmation, type or paste the workspace name exactly as shown, then select Confirm.
If the status changes to Ready after inspection, no reset confirmation is needed. You can start browsing and editing table data immediately.
What Avora Checks
Inspection compares the current workspace diagram with the database target. If the database is ready, Avora loads the generated entity tables. If the database is missing, empty, or using an older workspace schema, Avora asks for confirmation before it creates or refreshes the managed tables.
The workspace-name confirmation protects real data from accidental resets. Keep Protected Mode enabled unless you are working with disposable development data.
Database URL
The database URL is usually handled automatically. Avora reads the saved workspace environment and fills the Database URL field for you. The field is hidden by default, and the Saved env badge means the current URL already matches the workspace environment.
Avora reads AVORA_DATABASE_VIEW_URL first, then falls back to DATABASE_URL. Use AVORA_DATABASE_VIEW_URL only when the Database view should connect to a different PostgreSQL target than the generated backend runtime.
Use the Target details to verify the host and database name before confirming a reset. Only edit and save the URL manually when the field is empty, the target is wrong, or you intentionally want the Database view to use a different PostgreSQL database.
| Connection state | Meaning |
|---|---|
| Not connected | No database has been inspected in this view yet. |
| Ready | The target database matches the workspace schema and rows can be loaded. |
| Database missing | The database name in the URL does not exist yet. |
| Needs reset | Managed tables have not been created for this workspace. |
| Schema mismatch | The workspace diagram changed after the database tables were prepared. |
Protected Mode
Protected Mode is the default. It still lets you inspect the database, but it adds the workspace-name confirmation before any reset can run.
Direct Access skips that confirmation and can reset managed tables automatically. Use it only for disposable development data where automatic reset is acceptable.
Explore Data
After inspection returns Ready, Avora lists one table section per generated entity.
Use the table controls to inspect data safely:
| Control | Use it to |
|---|---|
| Search database tables | Filter the visible table list by entity, table, or field name. |
| Collapse or expand | Hide tables you are not currently inspecting. |
| Refresh all | Reload every visible table from the database. |
| Refresh table | Reload one table without changing the others. |
| Filter | Add field filters such as equals, contains, starts, greater than, in, null, or not null. |
| Column header | Toggle ascending sort, descending sort, or no sort for that field. |
| Pagination | Move through table rows in pages of 25. |
Selecting a class node in the Diagram view can focus the matching entity table when you open Database, making it easier to inspect records for the model you were editing.
Manage Records
Use record editing for development data, demos, QA checks, and controlled corrections. For production data, confirm the target database and workspace state before making changes.
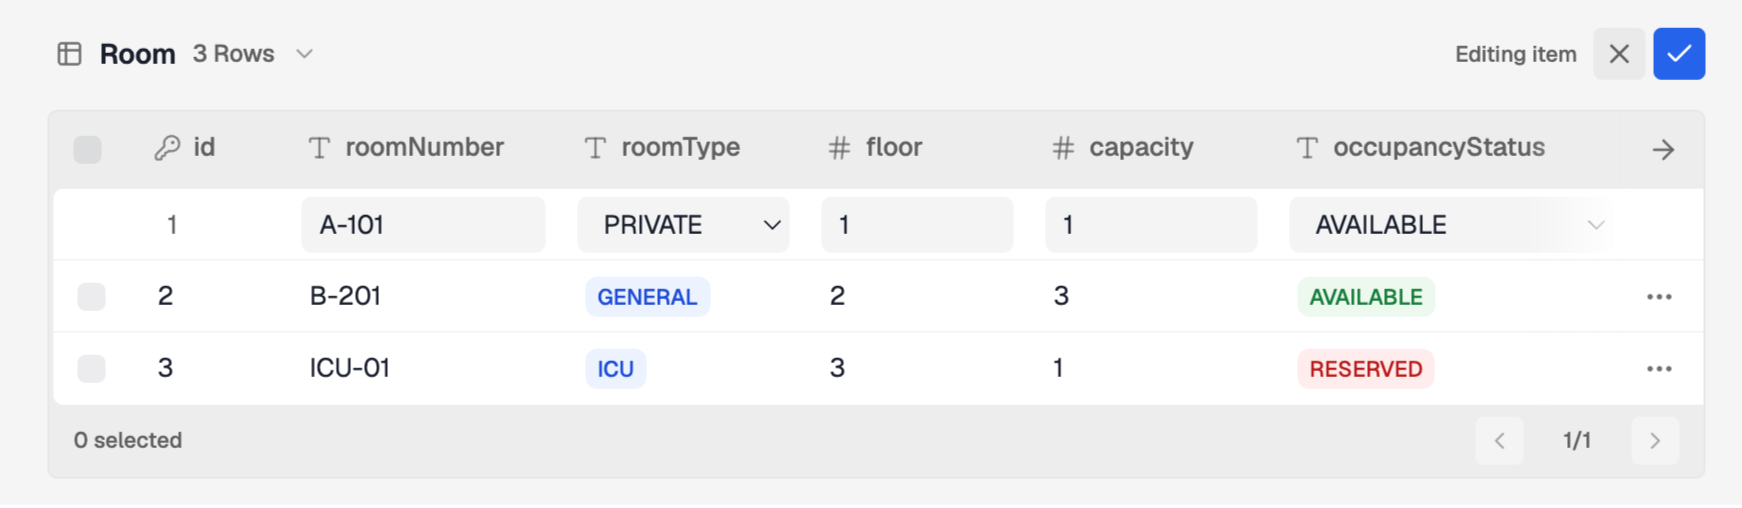
The management figure shows a row in edit mode. Standard fields such as roomNumber, floor, and capacity use direct inputs. Enum-backed fields such as roomType and occupancyStatus use dropdown controls populated from the enum values defined in the workspace schema, so a status field can suggest available values like AVAILABLE or RESERVED directly from the enum instead of relying on free text.
To add a row:
- Inspect the database and confirm the status is Ready.
- Open the target table.
- Select the add-row action.
- Fill the generated fields.
- Leave auto-increment primary keys empty when the database should assign them.
- Save the row.
To edit a row:
- Open the row actions for the record.
- Update editable fields.
- Save the row.
- Refresh the table if related records changed elsewhere.
To delete rows:
- Select one or more rows with the checkboxes.
- Select the delete action.
- Confirm the selected count.
Field inputs follow the generated schema. Enum fields use the available values from their matching enum, boolean fields use true/false choices, list fields accept JSON arrays or comma-separated values, and primary keys are locked while editing existing rows.
AI database changes can also be prepared from the database prompt when the database is ready. Avora validates the suggested insert, update, delete, and relation operations, then asks you to review them before applying the changes.
Import and Export
Use export when you need a local copy of the rows currently loaded in a table.
To export table data:
- Inspect the database and open the table.
- Filter or sort the rows if needed.
- Open the table actions menu.
- Select Export JSON or Export CSV.
Result: Avora downloads the currently loaded table rows in the selected format.
Full database-level Export database and Import database controls are visible in the main database options menu, but they currently show a coming-soon message. Use per-table JSON or CSV export for available data export today.
Need to run the backend that uses this data? Return to Deployment or review Code Generation before publishing code.
Example: Verify a Task Record
After creating a Task through your preview API, open the Database view and confirm its target before inspecting records. Expand the Task table, refresh it, and locate the title you submitted. The ID is assigned according to the primary-key configuration you chose.
Compare the stored title and completed value with the API response. If the record is absent, check that the create request's logic actually persists it and that the runtime and Database view point to the same database. Avoid resetting a database merely because a record is missing.
PostgreSQL Management and MongoDB Generation
This guide covers the interactive PostgreSQL Database view. Selecting MongoDB for backend code generation is a separate operation. Account settings also list a MongoDB import integration that is marked coming soon; it should not be confused with the code-generation target.
For connection failures, check the database host, database name, credentials, and network reachability from the Avora backend. For Schema mismatch, review what changed in the model and use the documented protected confirmation flow before any reset.