Build API Endpoints with the Request Builder
Use the Request Builder to define the API endpoints exposed by your backend. Each request combines an HTTP method and path with inputs, outputs, access rules, and a logic flow.
Open a workspace and select Requests in the navbar. Requests associated with an entity are organized under that entity's group; requests without an entity appear under Ungrouped.
This guide is organized around the visual examples below:
- The canvas video shows how dropping a request into an entity group adapts its path, name, and group context.
- The interactive demo shows creating a request from an input plate and adding request parameters.
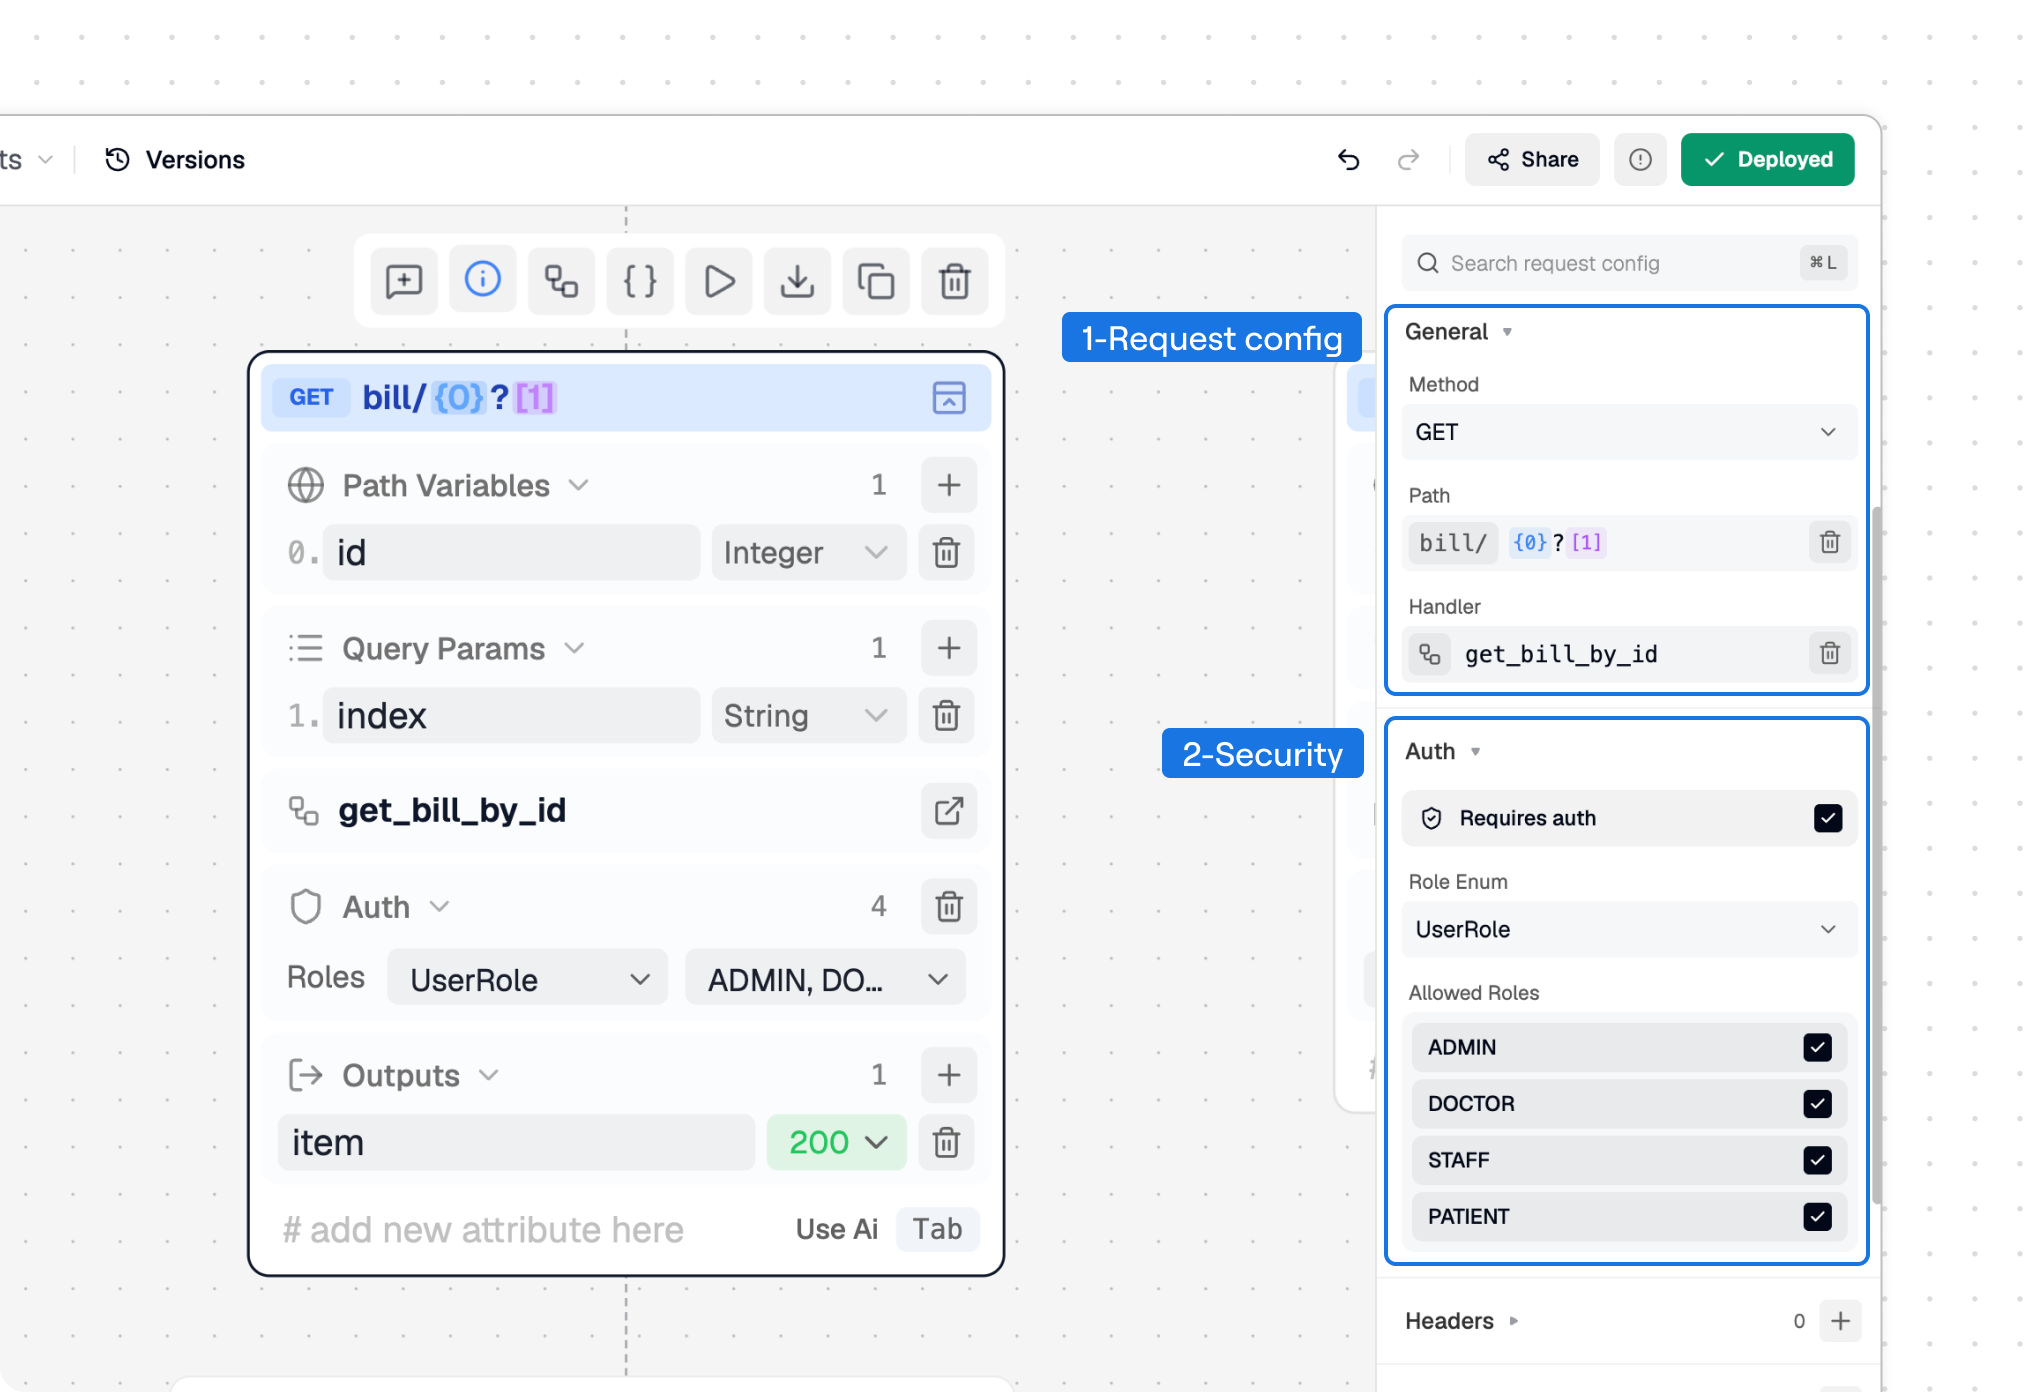
- The configuration figure shows the selected request contract alongside its general and security settings.
Create a Request
Create a request after the relevant entities and enums exist. This lets Avora offer the correct object types, fields, CRUD templates, and roles while you configure the endpoint.
From the Canvas
Use the canvas when you want to choose the endpoint method and its group visually.
- Open the Requests view.
- In the right sidebar, find Requests and the HTTP Methods tiles.
- Drag GET, POST, PUT, PATCH, or DELETE into the intended entity group line on the canvas.
- Drop position matters: Avora adapts the request path, naming, and group context from the entity area where you place it.
- Select the new request and review its generated input and output structure before opening the logic flow.
When an existing request is selected, Show more also exposes authentication request templates such as Login, Signup, and Refresh Token.
From an Input Plate
Each request group has an add control that opens a contextual input plate.
- Select the add control in the entity group where the route belongs.
- Start typing to filter the suggested templates.
- Choose an individual request, Full CRUD, or Auth Pack with the arrow keys.
- Press Enter to add the selection.
The same demo also shows how to add request parameters after the request is created. CRUD templates use the linked entity attributes and the workspace authentication expectation. Treat them as a starting point: inspect their paths, fields, status codes, access rules, and logic before generating code.
Request Settings
Select a request node to edit its settings in the right configuration sidebar. Changes made in the inspector and on the canvas stay synchronized.
The figure below shows the two main inspector areas for a selected request: 1 general request configuration for method, path, and handler, and 2 security settings for authentication, role enum, and allowed roles. The request node on the canvas mirrors the same contract with path variables, query params, auth, and outputs.
Method and Path
Choose the method that matches the endpoint behavior:
| Method | Typical use |
|---|---|
| GET | Read one record or a collection without changing data. |
| POST | Create a record or start an operation. |
| PUT | Replace or fully update an existing record. |
| PATCH | Partially update an existing record. |
| DELETE | Remove a record. |
Enter the path relative to its group. Use readable nouns, keep naming consistent, and put variable values in path tags rather than hard-coding examples.
For example, a request in the users group can use {id} to produce a route shaped like users/{id}. Typing { inserts a path-variable tag; typing [ inserts a query-parameter tag. Avora keeps those tags synchronized with the corresponding field lists.
Path Variables
Path variables identify a resource within the URL, such as the id in /orders/{id}.
- Add a path-variable tag in the path or select Add in the Path Variables section.
- Give the variable a descriptive name.
- Choose the type that matches the referenced identifier.
- Confirm the tag remains in the route and the variable appears once in the field list.
Removing a path-variable tag removes its synchronized definition. If a request needs optional filtering instead, use a query parameter so the endpoint still works when the value is absent.
General Settings
The General section controls the request method, path, and handler. The handler names the logic flow that runs when the route is called; select its flow icon to open that logic.
Use Advanced Options only when the endpoint needs behavior beyond the defaults:
| Option | Purpose |
|---|---|
| Time to Live | Sets how long a reusable or cached response remains valid. |
| Stream API | Sends the response progressively when supported by the generated runtime. |
| Decode Response | Decodes the returned value before it is sent to the caller. |
Use a unique, action-oriented handler name. If you rename it, reopen the logic flow and confirm its breadcrumb and connections still describe the request correctly.
Inputs and Outputs
Inputs define what callers can send. Outputs define the named response shapes and status codes that the logic flow can return.
Request Inputs
A request can receive values from several locations:
| Input section | Use it for |
|---|---|
| Headers | Metadata such as a correlation ID or required integration header. Authentication headers are normally handled by the auth settings. |
| Path Variables | Required identifiers embedded in the route. |
| Query Params | Filtering, searching, sorting, and pagination values that follow the route. |
| Inputs | The structured request body used by create, update, and action endpoints. |
For every input, set a stable name and the narrowest correct type. You can use built-in types, workspace enums, or workspace entities. Drag rows to reorder them when the generated request shape needs a clearer sequence.
The request-creation demo above shows this flow in context. The input plate at the bottom of a request provides shortcuts for Header, Path Var, Query Param, Input, and other sections. Enter name: type for a field or press Tab to ask AI to update the selected request.
Response Outputs
An output pairs a response name with an HTTP status code. Create separate outputs when the endpoint can return meaningfully different results.
- Add an item in Outputs.
- Name the response for its outcome, such as
created,notFound, orforbidden. - Select the matching status code.
- Open the logic flow and connect the correct action result or error path to that output.
Use one clear success output for the normal path and explicit error outputs for failures the caller should handle.
Status and Errors
Choose status codes that describe the actual result rather than returning 200 for every branch.
| Range | Meaning | Common examples |
|---|---|---|
| 2xx | The request succeeded. | 200 OK, 201 Created, 204 No Content |
| 4xx | The caller must change the request or lacks access. | 400 Bad Request, 401 Unauthorized, 403 Forbidden, 404 Not Found, 409 Conflict |
| 5xx | The backend or an integration failed unexpectedly. | 500 Internal Server Error, 502 Bad Gateway |
On the canvas and in the left sidebar, outputs with a status of 400 or higher are shown as error outcomes. Define an error output before wiring an action node's error handle to it.
Review the Outputs section on the selected request before opening its handler. Every success or error branch used in the logic flow should have a matching named output and status code in the request contract.
Access and Roles
Access settings determine whether a request is public, authenticated, or restricted to specific roles.
- Select the request and expand Auth.
- Enable Requires auth for any route that reads or changes protected data.
- To restrict by role, choose a workspace enum in Role Enum.
- Select one or more values under Allowed Roles.
- Review authentication failures in the request outputs and logic flow.
If Requires auth is off, the endpoint is public and no roles are enforced. If auth is on but no role enum is selected, any authenticated caller can reach it. Selecting roles limits access to callers whose role matches one of those values.
Disabling authentication clears the selected role enum and allowed roles. Confirm this change before leaving the request.
After the request contract is complete, open its handler and continue to Logic Flow Builder.
Example: Create and List Tasks
Use this example contract with the Task model from Diagram Builder. These are choices to configure in your workspace, rather than defaults that every generated backend uses.
| Request | Input | Successful output | Access |
|---|---|---|---|
POST /tasks | Required string title | A Task output named task, with status 201 | Authenticated user |
GET /tasks | No body for this example | A list of Task records named tasks, with status 200 | Authenticated user |
An example create request body is:
{"title": "Prepare the launch"}
If your response output is named task and the new record receives ID 1, the response you configure could look like:
{"task": {"id": 1, "title": "Prepare the launch", "completed": false}}
Connect the create flow to the action that saves the record and supplies completed as false. Connect the saved Task to the 201 output. For the list request, connect the collection returned by the read action to the tasks output.
Test the API Contract
Open the generated Swagger documentation after deploying a preview. Authorize the request with a test account, submit a valid title, and compare the actual response with the output contract. Then test an empty title and a request without credentials.
Use the status codes and error bodies configured in your request and logic flow. If the response is missing a field, inspect the output mapping. If the route cannot be found, compare the deployed path with the current request path and regenerate the preview after changes.